Facebook 面試考什麼 - DOM Tree 篇
雖然自知能力還不足,但能有機會跟 Facebook 電話面試 (美國面試 6-8 關,電話面試只是第 2 關而已 ),也可以算是人生成就了吧! 覺得大家應該會好奇國外面試除了演算法/資料結構還會考些什麼有趣題目。
不過這篇只會介紹其中一題而已,因為題目背後的相關知識太多需要說明了。
寫這篇動機
第一眼看到面試題目其實有傻眼到,不過後來細細想來其實並沒有那麼難 (如果對 DOM 掌握度夠熟的話)。問題來了,自己對於用 "jQuery" 操作 DOM 還算熟 (eg()、parent()、siblings()...) 但面試是不允許用任何框架的,而我對原生 DOM 真的不太行,所以此篇文章就誕生了~
看完這篇你應該要會
- 來去自如遍歷 DOM Tree 與搜尋 node
- 新增刪除修改 node
- 知道如何解 Facebbok 的這一題
圖片出處
這篇用到很多 The Modern JavaScript Tutorial 裡的圖,我只能說他的教學跟圖都太棒了 ,這一篇也算是擷取其中 Document 精華,非常建議大家上去看原文.
開始之前先看題目
Given two identical DOM tree structures, A and B, and a node from A, find the corresponding node in B
翻譯: 給 A 跟 B 兩個一模一樣的 DOM Tree 結構,輸入 A 裡面的 child node,請找出對應在 B 裡面的 child node
解題很重要就是要知道輸入 input 跟輸出 ouput (return),所以我這邊直接整理一下
/**
 * @param {DOM} A
 * @param {DOM} B
 * @param {node} node in A
 * @return {node} corresponding node in B
*/<body>
<div id="rootA">
<div>
<div>a</div>
</div>
<div></div>
<div>
<div>A
<div id="nodeA">A</div>
<div></div>
</div>
</div>
</div>
<div id="rootB">
<div>
<div>b</div>
</div>
<div></div>
<div>
<div>B
<div id="nodeB">B</div>
<div></div>
</div>
</div>
</div>
</body>若已經知道怎麼解就可以關掉這篇了,接下來我會先介紹操作 DOM 基本操作最後再來解這題。
來去自如遍歷 DOM
DOM 的最上層 (root) 就是 document [延伸閱讀: Browser environment, specs],nodes 包含
- element node (所有 HTML tag 都是 element node,例如
<div>、<h1>) - text nodes (純 string),甚至連 comment 都會出現在 node 上 [延伸閱讀: DOM tree]
這篇會把重點放在 element-only 上,因為我們比較常針對 element nodes 去找東西.而 element only 的 Tree 通常會由 document.body 開始 (廢話 你 HTML code 一定會寫在 body 裡)
<body>
    <div id="root">爸媽
        <h1>我姊姊</h1>
        <ul>我
            <li>大寶</l1>
            <li>二寶</l1>
            <li>三寶</l1>
        </ul>
        <p>我弟弟</p>
    </div>
</body><script>
let target = document.querySelector('ul')
// 下一個跟自己同層級的兄弟姊妹 node
target.nextElementSibling; // <p>我弟弟</p>
// 前一個跟自己同層級的兄弟姊妹 node
target.previousElementSibling; // <h1>我姊姊</h1>
// 上一層的爸媽 node
target.parentElement; // <div id="root">爸媽...</div>
// 下一層的小孩們 nodeList
target.children; / HTMLCollection(3) [li, li, li]
// 下一層的第一個小孩
target.children[0] // <li>大寶</a>
target.firstElementChild; // <li>大寶</a>
// 總小孩數
target.children.length // 3
// 下一層的最後一個小孩
target.children[target.children.length - 1] // <li>三寶</a>
target.lastElementChild; // <li>三寶</a>
</script>搜尋 node : getElement, querySelector
假如每次搜尋 node 都去算是第幾個 index 然後 children[index] 或 previosElementSiblings 豈不很麻煩,所以 DOM 提供一些快速抓取特定 node 的方法
getElementById('idname')
回傳 "一個" 特定 node。基本上這個方法是 Big O(1),搜尋速度相當快.記得一個 id 是唯一的一個頁面只能有一個相同 id 名,不然你抓到的很有可能不是預期中的 node
<div id="elem">
  <div id="elem-content">Element</div>
</div>

<script>
  // get the element
  let elem = document.getElementById('elem');

  // make its background red
  elem.style.background = 'red';
</script>
querySelectorAll
回傳 nodeList 。所以假如要針對抓到的 nodeList 做事需要 forEach 或 for of
<ul>
  <li>The</li>
  <li>test</li>
</ul>
<ul>
  <li>has</li>
  <li>passed</li>
</ul>
<script>
  let elements = document.querySelectorAll('ul > li:last-child');

  for (let elem of elements) {
    alert(elem.innerHTML); // "test", "passed"
  }
</script>
querySelector
回傳 "第一個" 抓到的 node,所以 elem.querySelectorAll(css)[0] 其實會等於 elem.querySelector(css)
getElementsBy*
回傳 NodeList。記得是 Elements 有 s ,常見的有下列幾種
elem.getElementsByTagName(tag)elem.getElementsByClassName(className)elem.getElementsByName(name)
你可以能會想說 elem.querySelector* 完全可以取代以上三種方法,沒錯! 但是他們有一個最大不一樣就是 Live collections
Live collections ?
Live 意思就是會自動更新,基本上 getElementsBy* 都是 live,但 querySelector 是 static 所以不會自動更新.直接來看範例比較好理解
// getElementsBy*:  Live collections
<div>First div</div>

<script>
  let divs = document.getElementsByTagName('div');
  alert(divs.length); // 1
</script>

<div>Second div</div>

<script>
  alert(divs.length); // 2 這邊會自動更新成 2
</script>
// querySelector: Static collections
<div>First div</div>
<script>
let divs = document.querySelectorAll('div');
alert(divs.length); // 1
</script>
<div>Second div</div>
<script>
alert(divs.length); // 還是 1 喔
</script>There are 6 main methods to search for nodes in DOM
| Method | Searches by... | Can call on an ele? | Live? |
|---|---|---|---|
| querySelector | CSS-selector | v | - |
| querySelectorAll | CSS-selector | v | - |
| getElementById | id | - | - |
| getElementsByName | name | - | v |
| getElementsByTagName | tag or * | v | v |
| getElementsByClassName | class | v | v |
可以來這邊測試是不是都理解了
matches
前面都是查找 DOM,這個方法是會回傳 Boolean,告訴你這個 Node 是否符合搜尋條件
<a href="http://example.com/file.zip">...</a>
<a href="http://ya.ru">...</a>

<script>
  // can be any collection instead of document.body.children
  for (let elem of document.body.children) {
    if (elem.matches('a[href$="zip"]')) {
      alert("The archive reference: " + elem.href );
    }
  }
</script>
新增刪除修改 node
如何用純 js 動態產生以下呢
<div class="alert">
  <strong>Hi there!</strong> You've read an important message.
</div>
新增 nodes
有兩種方式可以新增 DOM nodes
// Element node
let div = document.createElement('div')

// Text node
let textNode = document.createTextNode('Here I am')
所以結合以上答案就是
let div = document.createElement('div');
div.className = "alert"  // div.classList.add('alert'); 也可以
div.innerHTML = "<strong>Hi there!</strong> You've read an important message.
</div>"
新增完你會發現頁面上看不到啊,因為我們只是先 "產生" 這個 tag 並給他內容而已,並沒有 "插入" 到現有網頁上。
插入頁面方法
先來看圖,因為他的圖實在畫得太好.我都不用再畫一次
<ol id="ol">
  <li>0</li>
  <li>1</li>
  <li>2</li>
</ol>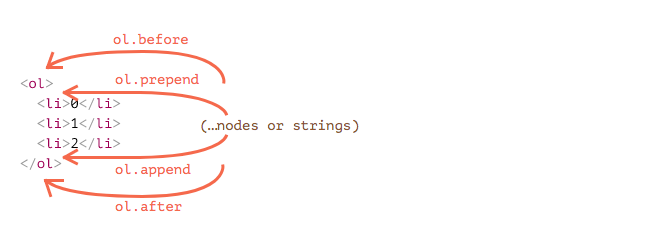
let div = document.createElement('h1');
div.innerText = 'Hi'
let ele = document.querySelector('ol');

ele.before(div)
ele.prepend(div)
ele.append(div)
ele.after(div)
<!-- ele.before(div) -->
<h1>Hi</h1>
<ol id="ol">
...
</ol>
<!-- ele.prepend(div) -->
<ol id="ol">
<h1>Hi</h1>
<li>0</li>
...
</ol>
<!-- ele.append(div) -->
<ol id="ol">
...
<li>2</li>
<h1>Hi</h1>
</ol>
<!-- ele.after(div) -->
<ol id="ol">
...
</ol>
<h1>Hi</h1>Node removal
node.remove()
let div = document.createElement('div');
div.className = "alert";
div.innerHTML = "<strong>Hi there!</strong> You've read an important message.";

document.body.append(div);
setTimeout(() => div.remove(), 1000);
複製 nodes: cloneNode
node.cloneNode([Boolean]);
複製現有 node 比一個一個新增要快上許多,後面的參數 Boolean 可以是 true 或 false
- node.cloneNode(true): 深層複製,代表連他所有屬性以及子層都會被複製到
- node.cloneNode(false): 淺層複製,並不會連子層一起複製
<div class="alert" id="div">
  <strong>Hi there!</strong> You've read an important message.
</div>
深層複製
let div = document.getElementById('div')
let div2 = div.cloneNode(true)
div2.querySelector('strong').innerText = 'hello';
div.after(div2)
HTML 會長這樣
<div class="alert" id="div">
  <strong>Hi there!</strong> You've read an important message.
</div>
<div class="alert" id="div">
  <strong>hello</strong> You've read an important message.
</div>
淺層複製
let div = document.getElementById('div')
let div2 = div.cloneNode(false)
div.after(div2)
HTML 會長這樣
<div class="alert" id="div">
  <strong>Hi there!</strong> You've read an important message.
</div>
<div class="alert" id="div"></div>
Old-school insert/remove methods
我發現大部份大家還是比較常用 appendChild、 insertBefore等等來達到插入 node 到頁面上.但作者建議不需要再用了,可以使用更彈性的新語法 append、prepand 取代.所以這邊我就整理要怎麼從就語法轉換到新語法囉p3vrl.jpg)
<ol id="list">
  <li>0</li>
  <li>1</li>
  <li>2</li>
</ol>

<script>
  let newLi = document.createElement('li');
  newLi.innerHTML = 'Hello, world!';

  list.appendChild(newLi);
    list.insertBefore(newLi, list.children[0]);
</script>
<!-- list.appendChild -->
<ol id="list">
<li>0</li>
<li>1</li>
<li>2</li>
<li>Hello, world!</li>
</ol>
<!-- list.insertBefore(newLi, list.children[0]) -->
<ol id="list">
<li>Hello, world!</li>
<li>0</li>
<li>1</li>
<li>2</li>
</ol>如何解題
看完以上應該要可以獨立解題了
- 首先必需要知道輸入的 node 層級,假如輸入的 node 是 document.getElementById('#nodeA'),以肉眼先觀察,你會知道 nodeA 是在從 root 數來第 3 個 child, 下面第 1 個 child ,再下面第一個 child 位置
p4y13.jpg)
<div id="rootA">
    <div>
      <div>a</div>
    </div>

    <div></div>


    <div><!-- 3. 這邊是 parentElements 下的 "第三個 node" -->
      <div>A <!-- 2. 這邊是 parentElements 下的 "第一個 node" -->
        <div id="nodeA">A</div> <!-- 1. 這邊是 parentElements 下的 "第一個 node" -->
        <div></div>
      </div>
    </div>
</div>
把層級由"裡而外" 存進某個 array [1, 1, 3]
const rootA = document.getElementById('rootA');
const rootB = document.getElementById('rootB');
const nodeA = document.getElementById('nodeA');
const nodeB = document.getElementById('nodeB');

function getPath(root, node){
    const path = [];  // [node index, 上一層 index, 再上一層 index...]
    while(node !== root){
      // 從當下這層一層層往上找
      const parent = node.parentElement;
      const children = Array.from(parent.children)
      const nodeIndex = children.indexOf(node)
      path.push(nodeIndex);
      node = parent;
    }
    return path;
}- 回到 DOM tree B 依照第一步驟的層級輸出相對應的 Node
function getNodeFromPath(node, path){

    while(path.length > 0){
      node = node.children[path.pop()]
    }
    return node;
}

console.log(getNodeFromPath(rootB, getPath(rootA, nodeA)) === nodeB) // true
補充
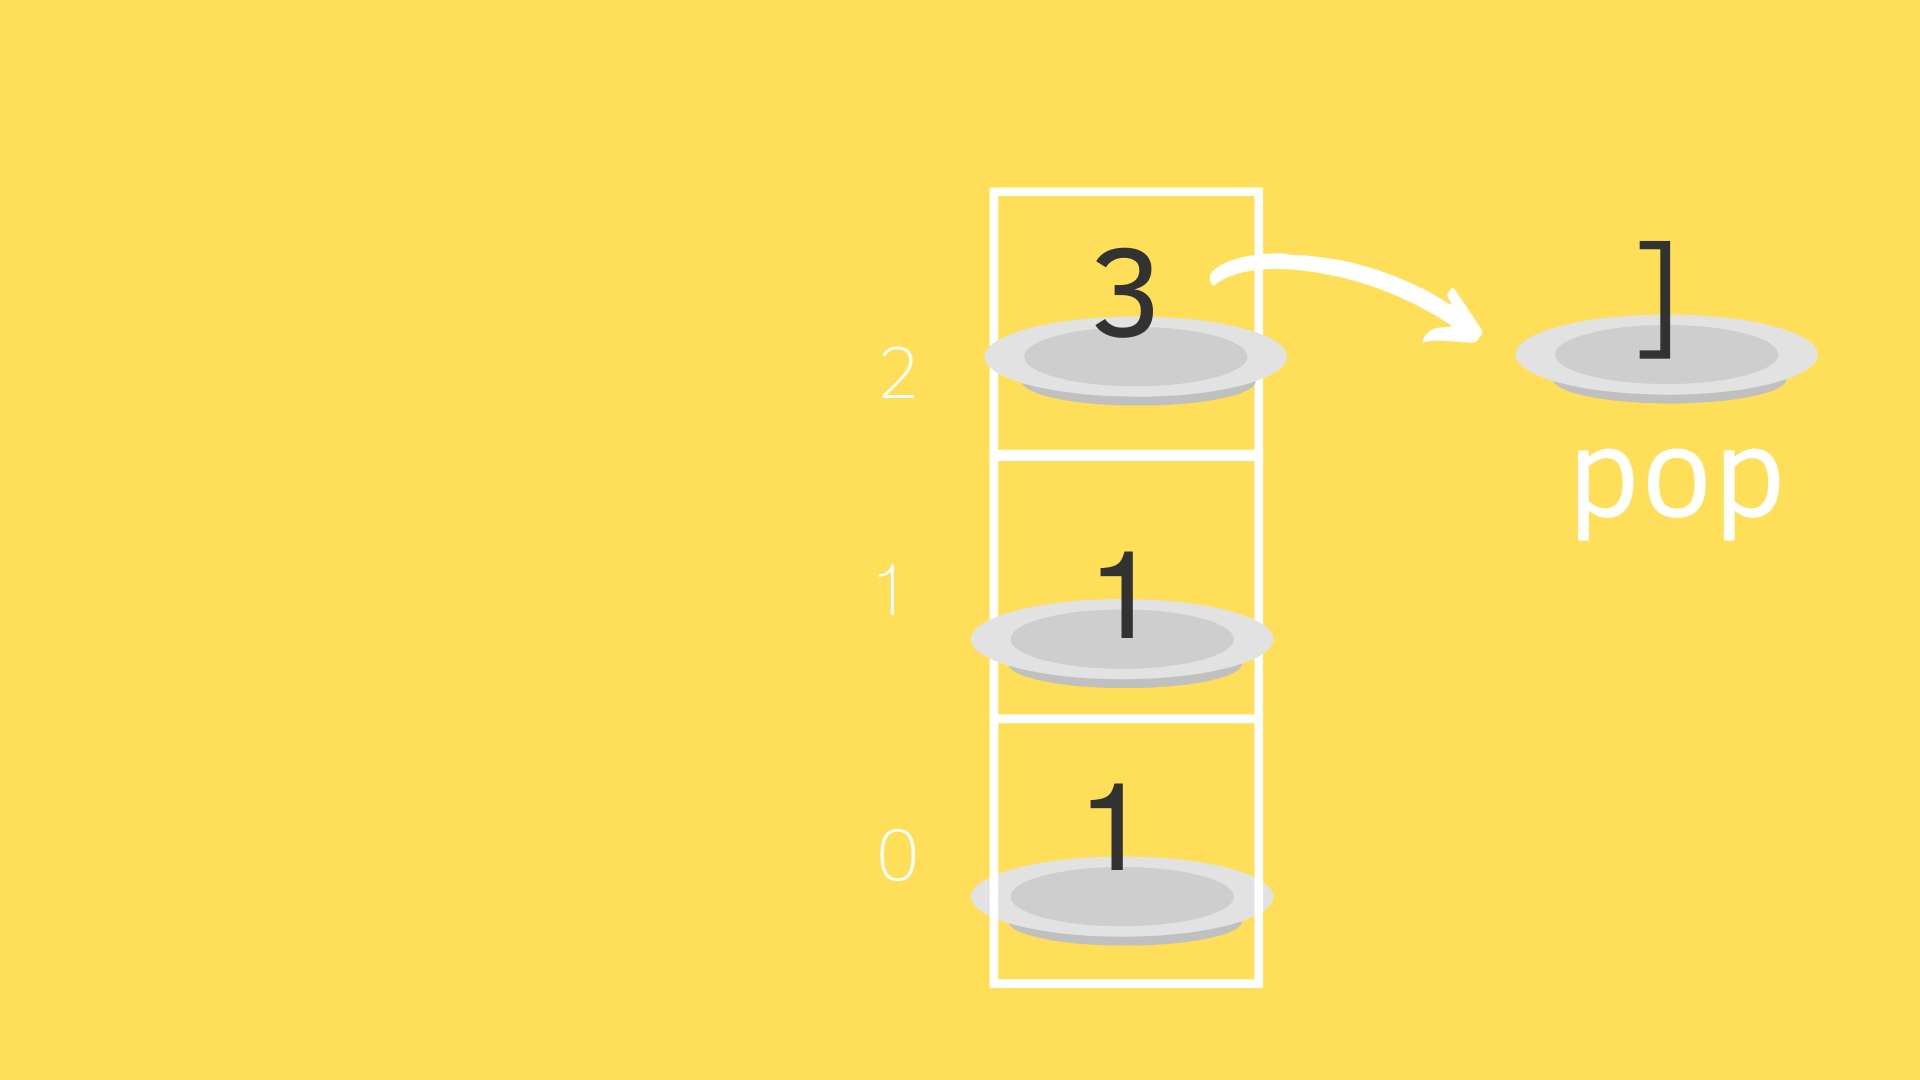
其實這題也是有小小用到 stack 觀念 [延伸閱讀: 堆疊 Stack]
- 從當下 node 開始存所在層級
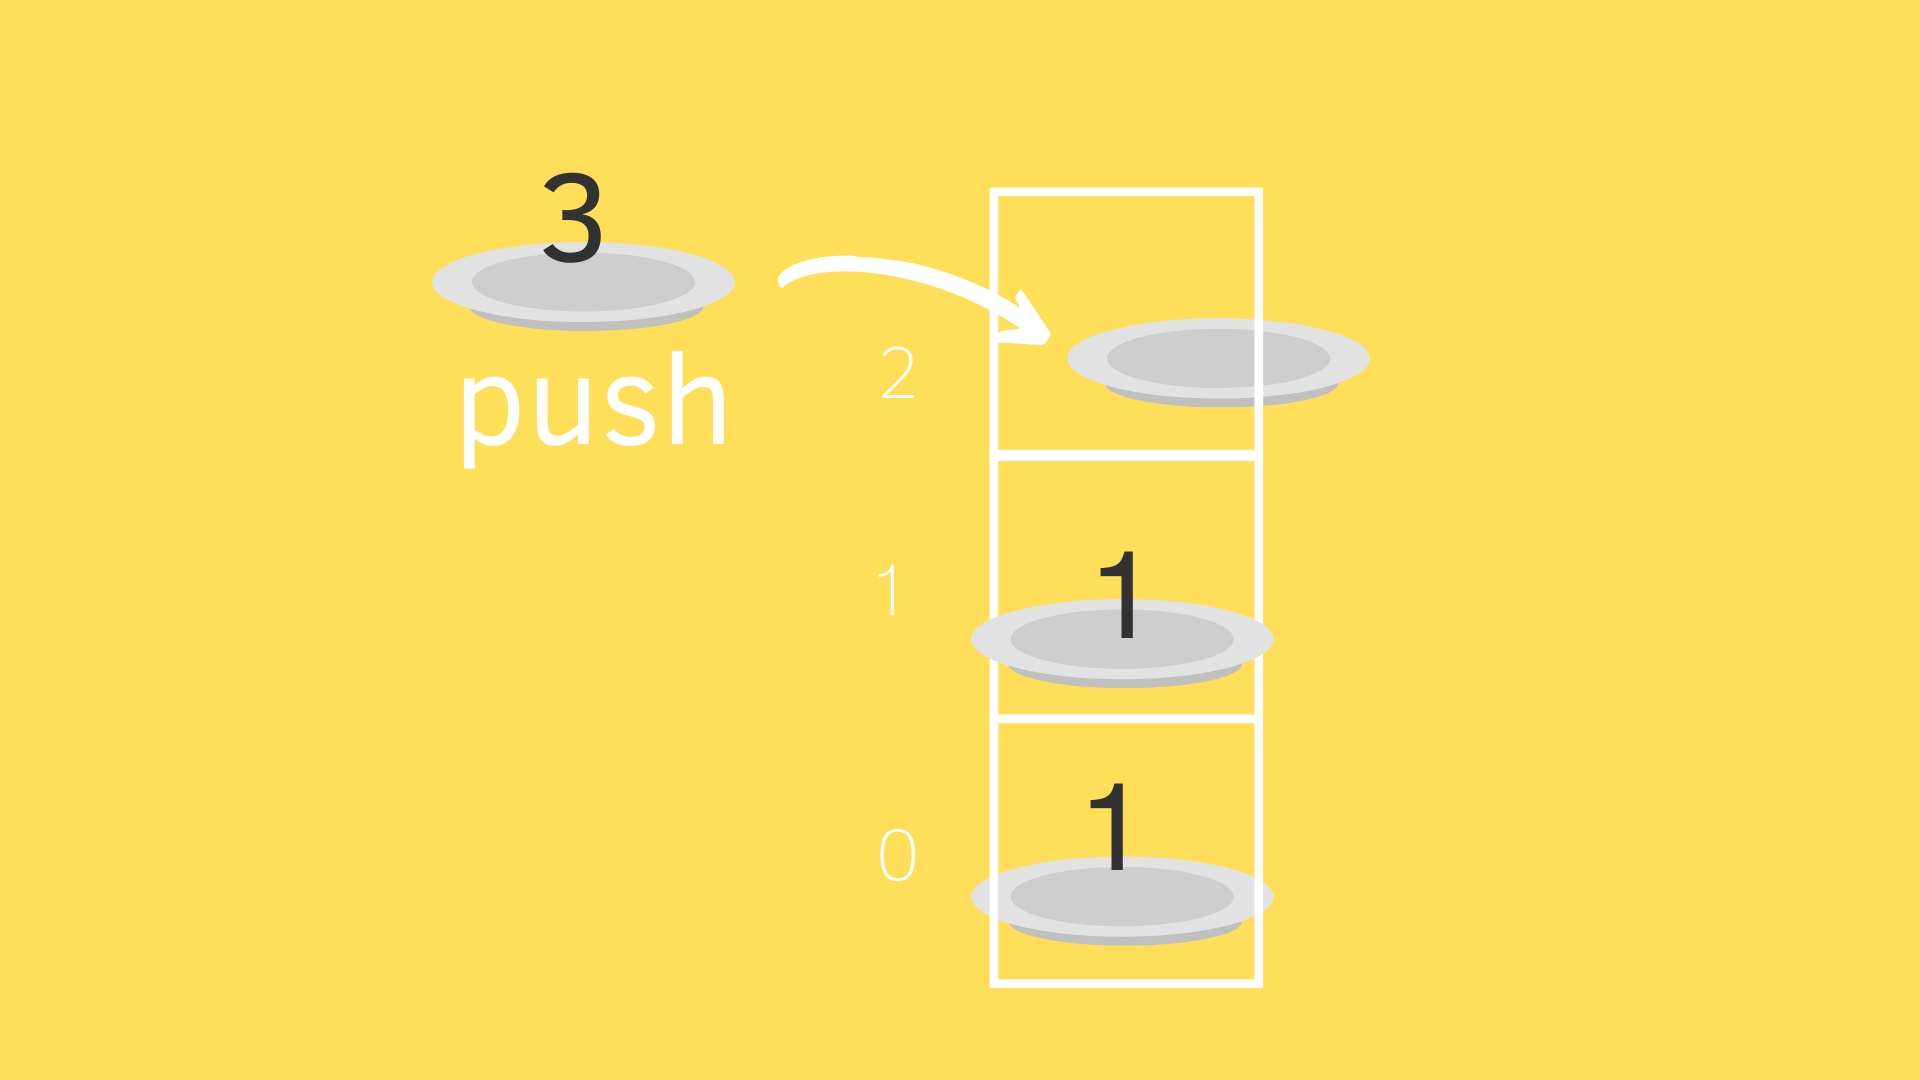
- 然後之後再從最上面拿出來
其實本來還想講一題很有趣的題目但礙於篇幅(每次都不小心寫好多)所以就請讀者自行練習啦!
題外話
找工作過程心裡真的很煎熬,但轉念把這些過程都變成練習與進步心態就變得輕鬆許多! 從中真的看到太多自己的不足需要更努力啊!
這裏也想分享 Facebook 提供給面試者的一些資源,對我很受用也提供給大家
- (這不用說了 大家都知) Learn JavaScript | MDN
- A re-introduction to JavaScript | MDN
- (超推) The Modern JavaScript Tutorial
- (也很推) JavaScript Garden
- Eloquent JavaScript
- Understanding ES6
- Learning Advanced JavaScript
- 5 Typical JavaScript Interview Exercises
- book helpful for CS fundamentals (please note this book in free pdf version is available through Google search).
 標籤雲
標籤雲 文章列表
文章列表